

DISCLAIMER: The information provided here is for entertainment purposes only. I do not know if the materials used by Sparklets, or any other early soda siphon makers, meet current standards for safety for drinking water. Furthermore, the gasket forming materials used in this project are not labeled for use in contact with food or beverages. If you should attempt to repair your own soda siphon using the information below, whether successful or not, I guarantee that you and everyone you know will die a horrible death in screaming agony. You have been warned.
One of the most dangerous phrases I know is "how hard could it be?" If you ever hear me say that, run away! That was the phrase that started the endless task of repairing an antique soda siphon I bought some years ago.
I found this soda siphon sometime in the 1990's at a thrift shop in Seattle. When I bought it I knew that all the rubber parts were shot, but I assumed that they could be replaced. Way back then the Internet didn't exist - or at least it didn't provide the universal marketplace that we know and love today. When I got my new treasure home, I went to the Yellow Pages to see what I could find [Anyone remember Yellow Pages? Big, heavy, floppy books full of outdated and incomplete information about vendors in a small geographic area, organized by random categories.] I don't recall what heading I thought was appropriate for antique soda siphon repair parts. Regardless, I didn't find what I needed, so it went up on a shelf as an ornament.
Around the middle of last year I went online to see about buying replacement parts for the soda siphon, since now the Internet provided me access to the entire world's bounty. I found a handful of websites that specialize in selling replacement parts for old soda siphons. Unfortunately, none of them sold parts for Sparklets - the company that made my siphon. One went so far as to explicitly state that they didn't carry Sparklets' parts. I can only assume that this is because Sparklets is out of business, and has been so for a long time. Sigh.
Fast forward to a time earlier this year. I was experimenting with making my own custom shoe orthotics. I read about a technique for making a silicone gel that was moldable into any shape and set up in a matter of minutes. The process involved using GE Silicone I mixed with cornstarch (note, supposedly the more commonly available GE silicone II won't work, though I haven't tried it.) Something about the corn starch allowed the silicone to set up in the absence of air - making it moldable. As it turned out, the resultant material was much too stiff to make a comfortable orthotic. But still, it was an interesting substance to work with. I recalled my antique soda siphon and thought "Hmmmmmm. How hard could it be?"
I went to the hardware store to see what interesting bits and pieces might be available for this project. I decided that before trying to make something with the moldable silicon goop, I would carve some rubber corks into the right shapes - possibly augmenting it with my silicone forming material. That was a total waste of time and money. I didn't get close to producing what I needed.
On my second trip to the hardware store I concluded that I would make a plaster cast of what remained of the existing parts, then form entirely new parts from silcone. It would have been a lot easier if I had known anything about plaster casting, but not knowing anything has never stopped me before. So, I bought a box of plaster of Paris and a jar of Vaseline and headed home to figure it out.

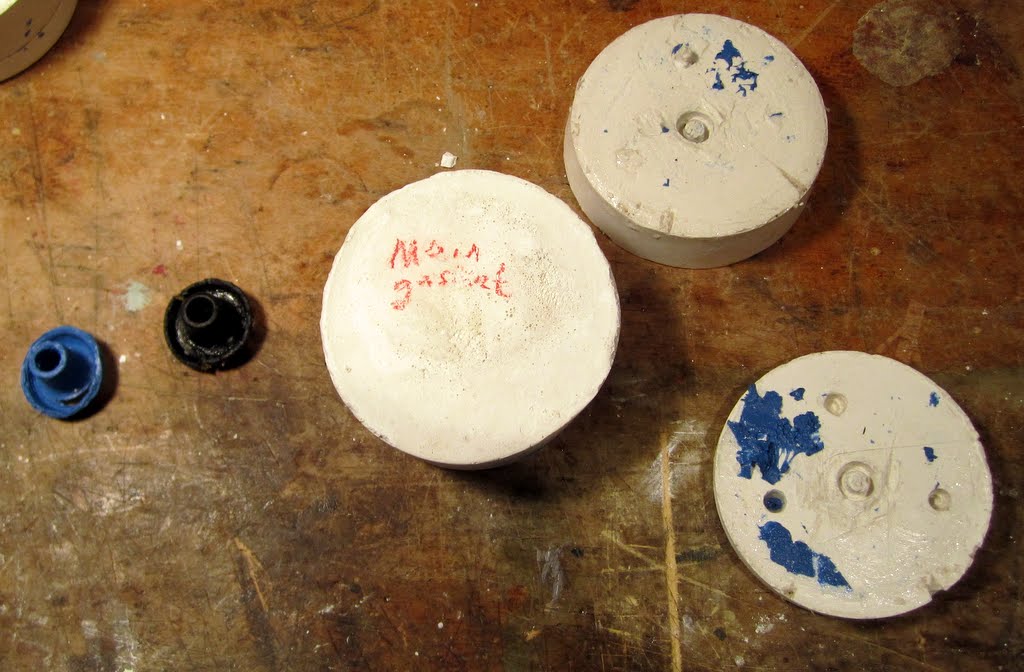
Using the bottoms of plastic cottage cheese containers as forms, I covered the dried up old rubber gaskets with Vaseline, mixed up a small batch of plaster of Paris, and formed the molds for the pieces: first I poured a layer of plaster, into which I pressed a gasket piece to its halfway point. After the plaster had dried, I carved some depressions in the base piece to act as registration marks. [I subsequently improved on that by embedding pieces dowel into the plaster.] I covered it with Vaseline then poured a second layer of plaster to cover the original gasket. Returning the next day I was able to knock the plaster molds out of the cottage cheese containers, and then pry apart the two halves with a screwdriver. Removing the old gasket left me with a nicely formed mold. I did have to wipe off all the extra Vaseline, and there was a certain amount of carving and buffing required to smooth out irregularities in the mold, but basically it was good to go. After all, "how hard could it be?"
I made up a batch of my silicone plus cornstarch goop, re-covered the molds with Vaseline, then schmeared the silicone into the molds with tongue depressors. I pressed the mold halves together (which could only go one way thanks to my registration marks,) and let the silicone set up. Of course I was impatient, repeatedly checking the molds over and over again before they were ready. As a result, the first set of gaskets, while the right shape, were riddled with holes and air pockets because I couldn't leave them alone while they were curing. So I cleaned it all up, tried again, and left it overnight.
When I opened the molds next day the parts looked great - though with lots of extra flanges that I had to cut off within X-Acto knife.

I put the soda syphon back together with my new gaskets, filled it with water, charged it with a soda charger, and tried it out. It worked! Except for two problems: first, water was leaking out of the handle. It turns out that I had missed one rubber part. Second, the silicone plus cornstarch gel made gaskets that were just too soft. The gasket that goes around the head of the soda charger deformed and blew out of its seating during the charging. The gasket that sat at the top of the bottle, though it held for that first use, had basically been cut in half when the top was screwed on. Still, it was exciting to see that the concept worked.
To fix the first problem I had to figure out how to disassemble the bottle top mechanism, which looked simple enough, but was thoroughly frozen together by years of assembly. Eventually, with cleansers, oil, and elbow grease I got the thing apart and found the decayed part. This one was a bit tricky, because it consisted of a metal plunger around which a rubber gasket was formed. Thus, I would need to make a mold that would hold the plunger and form a gasket around it. Tricky, but not impossible. The next day I had my new form ready.
To fix the first problem I had to figure out how to disassemble the bottle top mechanism, which looked simple enough, but was thoroughly frozen together by years of assembly. Eventually, with cleansers, oil, and elbow grease I got the thing apart and found the decayed part. This one was a bit tricky, because it consisted of a metal plunger around which a rubber gasket was formed. Thus, I would need to make a mold that would hold the plunger and form a gasket around it. Tricky, but not impossible. The next day I had my new form ready.

Back to the hardware store I went to solve the problem of the soft gaskets. This time I decided to go with gasket forming compound. I bought a tube of Permatex “Blue” RTV silicone gasket maker. I cleaned up my molds, schmeared them with Vaseline, fill them with gasket material, pressed them tight, and left them for the night. The next morning I pried the molds apart only to find that the gasket forming material had not dried at all. I had been under the impression that RTV silicone sets up without air. I'm not sure how this is supposed to work when making an automotive gasket (the real use for this product.) Supposedly you can put it between two engine parts, clamp it down, and a gasket will form. However, I really don't follow why RTV silicone would solidify in such an environment but not get solid inside the tube. The whole point of adding cornstarch to the GE silicone had been to overcome the problem of making silicon cure without air. In any case, the RTV silicone was supposed to set up when clamped between metal parts - perhaps something about my plaster molds or the presence of Vaseline inhibited it curing. In any case, I cleaned the still-liquid gasket forming material out of the molds, schmeared them with fresh Vaseline, then filled them with gasket forming material to which I added cornstarch.
The next day I open the molds again. Voilà! Beautiful bright blue gaskets that were much firmer than the prior GE silicone-based ones. I cut away the excess with my X-Acto knife, installed them in the soda siphon, and had a go. It worked almost perfectly, but again the damned charger gasket blew out during the charging. And, when I later took the top off, I discovered that the top gasket was partially cut - the blue Permatex wasn't strong enough. Fortunately, the lever no longer leaked.
Once again I went to the hardware store. This time I purchased Permatex “Ultra Grey Rigid High-Torque” RTV silicone gasket material. I cleaned up my molds, made a batch of gray silicone with cornstarch, filled the molds, pressed them shut, and waited overnight. The next day I discovered that for some reason the largest gasket hadn't set up. Evidently there's something about the gray high torque silicone gasket material that required either more time, or more cornstarch to make it cure. I'm sure you know what I did next. I cleaned the mold, made a batch of gasket forming material with extra cornstarch, filled the mold, pressed it shut, and waited overnight.
The next day I had a full set of beautiful gray gaskets. No doubt you will be pleased to know that they worked perfectly, and have continued to do so, charge after charge, for the last couple months.
 |
 |
So now I have a working antique soda siphon. Cool. That wasn't so hard, was it?

To see more, check out my update to this blog post: Repairing an Antique Soda Siphon – Redux.


Andrew,
ReplyDeleteThe reason the silicone didn't set up wasn't related to air, but the vaseline. Silicone will not set up in the presence of sulfur, which Vaseline contains. Any part of the liquid silicone that comes into contact with Vaseline will not set. If there is enough of it present, the sulfur can prevent the entire thing from setting up. Next time use a water based lubricant (like KY jelly) and you won't have that problem.
Now: can you tell me how you got the head assembly apart? I've got the same problem of water coming out of the lever and I'd like to fix it.
Thanks
Robert Smythe
Wow, so I was hoisted on my own petard by using Vaseline! Thanks for letting me know. Next time I need to make new gaskets, or do anything like this, I'll use something other than Vaseline. However, it's interesting to note that the cornstarch trick does appear to let the silicone set even with the Vaseline.
ReplyDeleteOn my Sparklets siphon, there is a pair of holes on top of the metal crown on the siphon’s top. These holes allow you to unscrew the metal crown. At first I attempted to use a pair of lock ring pliers to untwist the crown, but they are not designed for that kind of torque. I remembered that I had a "watch case wrench" that came with a watch repair kit I purchased a while back. I bought the kit because I wanted a watch band pin remover tool, but discovered that it was cheaper to buy the full kit than just that one tool. I had bought it on Meritline.com, but it appears that they don't sell it anymore. It looks like the exact same things available on Amazon.com here http://www.amazon.com/16-PCS-Watch-Tool-Kit/dp/B000T9VK56/ref=sr_1_7?ie=UTF8&qid=1312906780&sr=8-7 for a whopping seven bucks.
Even with the case wrench, I wasn't initially able to get the crown off. I scraped some gunk out from the seam where the crown met the siphon top, gave it a bit of 3-in-1 oil, and waited. When I returned an hour later I was able to get the crown to unscrew. I was happy that I did, because inside the crown there was a lot of accumulated goop from a century of use. I think that was worth cleaning out regardless of whether I needed to replace the seal inside.
The handle was held in place with a simple pin. I found an appropriately sized finish nail in my "coffee can of miscellaneous nails." Using that and a hammer I was able to knock out the lever pin and remove the lever.
Easy, huh?
Hope that helps.
Great story! It's a pretty siphon, love the color. Hang onto those molds just in case...
ReplyDeleteGreat work, Andrew! This reminds me very much of my first encounters with those vintage Soda Siphons. And I ended up refurbishing and selling them.
ReplyDeleteEverybody out there who isn't as adventurous as Andrew, check out our website, we sell those gaskets, bulb holders, glass tubes and also offer full repair.
Martin
Die Siphonmanufaktur
www.siphonmanufaktur.de/en/
Hi,
ReplyDeleteI'm trying to repair my Sparklets bottle too, but the I have this model (http://4.bp.blogspot.com/-A5bIw5ZaUGw/TqhyWO9BPuI/AAAAAAAAADs/5XT72nHS3QQ/s1600/spark4.JPG) and I can't unscrew the top. It seems to be plied in place. Is there a way to go around?
Thanks
Hi Jean-Samuel;
DeleteI really cant be certain, but my guess is that it must have been openable at some time. I know that some manufacturers produced bottles that were filled at a bottling factory and couldnt be opened by the user, but yours doesnt look like that from what I can see in the photo.
My guess is that it is stuck on by corrosion. I would try letting it soak in a liberal amount of 3-in-1 oil, or other penetrating oil. Another possibility is run the top under hot water, possibly even boiling water. That could cause the metal of the top to expand slightly (hopefully more than any expansion of the lower part) allowing removal. Finally, you could try searching for "removing corroded parts." That produces a number of potentially useful hits.
Best of luck, and please do let me know how it goes.
Andrew
I have a very similar model (but in much worse condition). If you have water leaking out of the handle, then you will need to fix the plunger gasket as above – but the very top of the top assembly is a piece of plated metal (copper in my case) which is formed and swaged over the top of the assembly. You can remove it with screwdrivers or a tiny crowbar, but it won't go back on easily. You'll have to come up with some other way to fit it on, as it holds in a spring. I haven't worked it out yet for my own one, but I may try hammering a new piece of copper over it (maybe using a harder coin of metal over the spring to prevent deforming).
DeleteHello Jean,
DeleteLike mine, yours is a crimped top. To remove it, you will have to destroy it. Take a look at the following video to see how a restoration company handles it...http://www.siphonmanufaktur.de/en/die-manufaktur/
Hi Jean-Samuel and expertpc,
Deletedid anyone of you succeed in replacing the crimped top? I am ahead of the same problem, mine is an old London Sparklets from the twenties. I didn't open the top yet, but I was thinking about using copper caps made for heating tubes and hammering them in the right shape.
Any ideas?
Best
Thomas
Hi Andrew: I have as a middle name also Andrew; by the way proud of it as you surely are; but I'm now congratulating you because you are an authentic American self sufficient citizen, and very useful to humanity. The skills that you can share are much more than anything else on the arsenal of our beloved country. Happy Holidays. Henry Andrew.
ReplyDeleteHello Andrew,
ReplyDeleteThanks so much for this post. I recently picked up a Sparklets soda siphon at an estate sale and found so little information online about them. I particularly enjoyed your get it down approach and will be creating my own gaskets it soon.
Hi Andrew,
ReplyDeleteWould you be willing to sell a set of your gaskets? I too have a Sparklets bottle and am pretty sure what you have would do the trick.
Hi Matthew. Thanks for reading the post and checking in. I'm afraid I'm not able to make parts for other people, but if you are in Oakland, CA, I could lend you the molds ;-)
DeleteMuch enjoyed your info re molding of parts. I have several of these bottles and like you, have been looking for some parts.
ReplyDeleteMost of these soda bottles (CO2 charger style) were made by ISI or LISS and have interchangeable parts. Many others were just labeled with different brand names. Others are Mixi, Kaiser, Mr. Fizz.... There were changes made around 1996. See links below for differences. The bottle in your photo is of the pre-1996 variety, but otherwise almost identical to the pre-96 ISI bottle that I own.
Some parts are very similar to some whipped cream chargers. Might be worth a try if you can get a whipped cream charger for parts at a good price.
Adding some links to put them on record for others who happen by here.
Prariemoon lists parts, new and old, including a complete replacement head.
http://www.prairiemoon.biz/cltaclrososi.html
ISI list parts, mostly post-96
http://www.isi-store.com/product_list.asp?SKW=isispare-parts&SEARCH=&HDR=&PGN=2
Lissamerica lists the small parts. Not sure if they are old or new style.
http://www.lissamerica.com/store/seltzer-parts-new.html
Ezychargers (Austria) has nice drawings and parts, but not clear how much to ship to U.S.
http://www.ezychargers.com.au/product_info.php?cPath=28_39&products_id=413&osCsid=t4medo992ggkehc6tapdrad0g4
Thanks for the links. I dont think the ISI or LISS parts will work with an old Sparklets soda syphon, but they may work with other, newer syphons. Unfortunately the PrairieMoon page notes that they are sold out and no longer able to get these parts.
DeleteI have an ISI from the 1980's which I just ordered replacement parts from them that are supposed to be for all models. They didn't fit. Supposedly according to them, my model is pre-1996 and they don't have those parts. I wish I could fix mine. To me, it's not that old. The plastic insert that fits in the mouth seems to be the problem, but what do I know. I may just have to buy a new one.
DeleteHey anon,
DeleteYou need to search for pre 96 is partes. I got a new bulk for my charger (1985) and have been using it for around 8 years.
I wish I could give you a link but I can't figure out who I purchased the bulb holder from.
They are out there though.
Good luck
Hi everyone, I am patricio, and live in Buenos Aires. I also have a C model, with the original top assembly. I removed the soft metal cap, carefully, so as not to damage it badly, and was able to, once I replaced rhe gastekts, asembly it again with the same cap. What I did was to buy a similar piece of rubber por the bottom gasket, the one that closes the valve, and worked it to fit exactly, and (as I hadn't read this article) made the top gasket (o ring type) with several rounds of teflon tape. Previously I polished the inner surface of the top assembly, and the cylinder, to remove some rust. It works perfectly. I also bought (just yesterday) the gasket for the top of the bottle and for the charging canister, to have a like new, working syphon
ReplyDeleteregards
The only gasket on my Liss soda siphon that is corroded is the one on the head that sits around the pin that punctures the charger. But I can't get any charge into the bottle. It all just blows out around the corroded gasket. You think the mold you created would make a gasket that fit thats part of the head?
ReplyDeleteI would imagine that the same general technique could be used, but I am not familiar with Liss siphons. I'd love to hear if it works for you.
DeleteAndrew
ReplyDeleteI too need to replace the grey gasket - did you, by chance , make a couple - willing to pay a good price!!!!
Hi Andrew;
DeleteI'm really sorry but I dont have extras and I'm not really comfortable making parts for other people. Hopefully you can find one, or make one for yourself using techniques like those I've described here.
A very useful page, thanks for leaving it up.
ReplyDeleteAgreed! I just want to second this. Thank you for leaving this page up. I got an invaluable amount of information and was also entertained by the problem solving enthusiasm!
Delete