Latest Posts


I find blogging very unsatisfying. It is the lack of feedback that bothers me. That, and the fact that several of my favorite past posts are rarely read. Blogger does give me feedback in the form of statistics – I can see how many hits a post has had over various time frames. I can see what parts of the world the hits came from. I can see if the hits came from a web search, or Facebook, and so on. But I can’t tell what the reader thought of the posting. Heck, I don’t know if they read it – perhaps they were searching for something, found my post which matched their keywords but wasn’t what they needed, and moved on after barely a glance. I don’t even know if the hits on the posts came from real people; they might be web crawlers indexing or scraping my pages.

When I write a new post, I tweet it and post it to my Facebook page. Sometimes friends will re-tweet or share about my post. For the next day or two readership of my blog goes way up – but only for that posting. If it contains keywords that are relatively rare online, but which people do search for (e.g. “Sparklets Soda Syphon”, or “Salmon Poisoning Disease”), then after a few days or weeks the post will begin getting hits from web searches. My postings about repairing an antique soda syphon and Kero getting salmon poisoning disease each receive fairly consistent views over time. Others, such as my thoughts on the death of Rodney King, are ignored; possibly because no one cares about Rodney King, or, more likely, because other more authoritative web pages are shown in search engines before mine.

But again, the data I get from Blogger has no meat to it. Did the people who read the pages like them? I get about one comment for every 1000 page views. The number of “likes” is closer to one in 5000 views. And it is fairly clear that when someone reads one of my posts, they rarely go on to read others. People read something that they found on Facebook or via a search, then leave. When I post about a new blog on Facebook, my friends will click “like” or comment – on Facebook! Not on the blog. I complain at them – “Hey! Comment on the blog itself, will ya?” I find it disheartening.

There is endless advice online (and from friends) about how to develop a following for a blog. Write on a narrow topic; blog frequently and consistently; and so forth. The problem is that I am caught in a Catch-22. I don’t get feedback on my blog, so I find it unsatisfying, so I don’t post consistently, so I don’t develop a readership, so I don’t get feedback.

This morning I had the experience of being a blog reader doing exactly what I don’t want my friends to do. A friend shared a link on Facebook. I read it and thought it was great. I “liked” my friend’s post on Facebook (he wasn’t the author of the blog.) I re-shared the link on Facebook. I even emailed it to a number of people. Then I went on with my day. Let me repeat that – then I went on with my day. I didn’t give the original author any feedback. She doesn’t know if I liked it or not. I didn’t look at any of her other postings to see if there was anything I might like as much (or more.) I behaved in exactly the way that I don’t want people to behave when they read my blog.

A half an hour later I realized what I had done. I went back to her blog and posted my comments there, and I’ve added this blog to my to-be-read list. Maybe I just need to have more faith that people are reading my postings and finding them useful or entertaining. We shall see.

A couple years ago I posted some thoughts on dealing with invasive ants in the garden and provided a recipe for homemade liquid ant poison (see The Uncarved Block - Ants!). My DIY ant poison has been successful, but, I have found liquid poison to be somewhat inconvenient – it is clumsy to distribute and goes bad quickly. Thinking back to my youth, I recalled how accidentally dropping a piece of candy would attract ants like crazy. So, I decided to try and make ant poison “gumdrops.” I have been experimenting with various formulations. This posting is a work in progress. I am having good results, but I’m still fine-tuning the proportions. Friends of mine have asked me for the recipe, so I decided to post it here. If you find it valuable, I would love to hear feedback which could help with improving these “gumdrops”.

I started with a recipe that I found online for gumdrops intended for human enjoyment. I removed all the niceties of a gumdrop that people might like to eat - flavorings, colorings, and attractive shapes. I also skipped any steps required to produce a pleasant texture in the mouth. All I cared about was creating a glob of stuff that is convenient to distribute, that ants will want to eat, and which contains a substance that will subsequently kill them.

The first batch I made was very soft and melted in the sun. In fact, while working in the garden, my original tray of “gumdrops” all melted together into a pool of liquid. They re-solidified when I brought them back inside, but still, I wasn't looking for a “melts-in-your-mouth” texture. I turned to my trusty copy of Harold McGee’s On Food and Cooking: The Science and Lore of the Kitchen, to learn about candies and jellies. From that reading I decided to add pectin and corn syrup. The next batch with these modifications was firmer and much more heat resistant.

When making gumdrops, the outside will be sticky and gooey, so the final step is to roll them in sugar. When I made my first batch I was concerned that a child or animal might find them and eat them. Borax is supposed to be basically harmless to mammals*, but, I wasn't 100% confident about that, and anyway, I wanted the gumdrops to stay where I put them so they would be eaten by ants, not by wayward kids. I figured that a sand coating would dissuade even the most intrepid sugar-fiend. Unfortunately, sand isn't as effective for this purpose as sugar, since sugar absorbs water while sand doesn’t. Coating the “gumdrops” in sugar draws out some of the water, making them firmer and making the coating stick better. Also, I didn't like dealing with the sand; somehow I ended up with sand everywhere. Like going to the beach, sand find its way into everything.

* According to Wikipedia, "...boric acid is poisonous if taken internally or inhaled in large quantities...5 to 20 g/kg has produced death in adult humans." The 3 tablespoons of boric acid in the recipe below weighs about 30g, so, eating the entire batch (yuck) shouldn't harm an adult. The Wikipedia article goes on to say that according to the ADTSR, "...the minimal lethal dose of ingested boron (as boric acid) was reported to be 2–3 g in infants, 5–6 g in children, and 15–20 g in adults."  However, in reading the ADTSR report, I was unable to find those numbers. I suspect they may refer to long-term exposure. I would be eager to hear if anyone has any additional information on boric acid toxicology.

For the next batch I decided to have faith that the average child has better sense than to eat random gobs of goo lying on the ground. I also trusted in the claims of borax safety. This time I dredged the “gumdrops” in sugar. Ultimately I have chosen to store them in a plastic container filled with sugar to keep them dry and separated. This is working well. So far the “gumdrops” are staying solid and dry and none of the pieces that I have distributed have disappeared (other than through the slow chewing of ants.) Note however that if you have children or pets, you may want to use sand or dirt regardless of the benefits of a sugar coating.


Lastly, I have been playing around with the amount of borax in the mix. Ant poison is tricky - one wants to have the ants bring the poison back to the nest before dying, but, the poison must ultimately achieve a lethal dose. Too poisonous and the ants just eat and die. A few hundred dead ants is nothing to an Argentine ant colony. Too little poison and you are just giving the colony a sugary treat. The original liquid recipe called for approximately 16 parts water to 8 parts sugar to 1 part boric acid. I assumed that for a non-liquid approach the water was effectively irrelevant; what was important was the sugar to borax ratio of 8:1, or 2 tablespoons borax to 1 cup sugar. With this ratio it seemed like it was taking weeks for the ants disappear. I guessed that it takes ants much longer to eat a gumdrop and carry the pieces back to the nest than to simply suck up liquid poison. Since then I have kicked up the ratio to 8:1.5, or 3 tablespoons borax to 1 cup sugar. The ants are disappearing much faster now – hopefully the colonies are dying as well. If you try this recipe, please let me know how it works for you.

Please note: I am not a doctor, chemist, nor entomologist. The recipe I’m providing here is based upon my reading and experiences in my own yard, not on formal training. If you choose to make and use either of my ant poison recipes, you do so at your own risk. I provide no warranties either for safety or efficacy.


Ingredients
  • Gelatin Mixture
    • 1 envelope plain gelatin
    • About 3.5 Tbs cold water (Just under 1/4 cup)

  • Sugar Mixture
    • 1/2 cup boiling water
    • 7/8 cups sugar
    • 1 Tbs corn syrup (light Karo)
    • ½ Tbs pectin
    • 3 Tbs borax*

  • About 1/8 cup ice cubes
  • Sugar (or Sand) for finishing gumdrops
* For borax, almost any roach powder should do. They are usually 99% boric acid in some formulation or other. I am using a product called "Hot Shot MaxAttrax Roach Killing Powder" which I get at Home Depot for about $5 a pound. One pound of boric acid lasts years when diluted to ant-poison levels. Note too that companies label their boric acid under a variety of names: borax, orthoboric acid, Trihydroxidoboron, etc.

Method

Pour the cold water into a bowl. Sprinkle evenly with the gelatin and allow it to “bloom” while you prepare the sugar mixture.

In another bowl, mix the ingredients for the sugar mixture. Make sure the sugar and pectin are fully dissolved. If not, microwave for a minute and stir until dissolved. [Note: this is simplified from making confections for humans where proper boiling of the sugar mixture matters.]

Add the hot sugar mixture into the gelatin mixture. Stir until the gelatin is completely dissolved.

Add the ice cubes to aid in cooling. For a delicious gumdrop you wouldn’t want to do this – you would let the jelly solidify slowly. But, for ant poison there is no point wasting time. Allow to cool completely and become firm.

Carve out blobs of gelatin with a spoon and dredge in sugar (or sand if you are concerned about the gumdrops looking too tempting.) Store in a container until ready to use. For the first few days I leave the container open so some water can evaporate, then I seal it to keep them “fresh.” Note: may melt if place in hot location. If so, allow it to re-cool and reform “gumdrops.”


There is an old, retired landfill jutting into the bay at the City of Albany, California. Referred to as the "Albany Bulb", it is an odd place who's future is always uncertain. It is administered by multiple governmental organizations. Various outside groups are constantly trying to turn it into something that they believe will be better than what is there now.

Personally, I love the Albany Bulb as it is. It is a place where nothing is permitted, but everything is allowed. Among its many features, remarkable artworks appear at The Bulb. Some simple graffiti, others significant paintings, still others large and complex sculptures (some kinetic.)

I was there on Friday with Kero (no dogs allowed).  There was a fantastic new six-sided artwork that really blew me away. Photos below (plus three more paintings on concrete slabs.)

Enjoy (until it's gone.)


The sections rotated


Three additional works painted on concrete slabs


A few weeks ago I bought a set of Teraforma Whisky Stones on Amazon.com. I really don't know why I bought them. It was dumb. I knew it was dumb. But I did it anyway. Sigh.

It is a cute idea to have whiskey literally "on the rocks", but in practice, frozen rocks simply can’t cool a drink the way ice can. The reason has to do with "enthalpy of fusion." [There is a useful discussion on Wikipedia for those that are interested.] Basically, it takes far more energy for a substance to change state (e.g. melt from a solid to a liquid, freeze from a liquid into a solid, or boil from a liquid to a gas) than it takes to change the temperature of a substance without changing its state.

Using Wikipedia's example, to raise the temperature of one kilogram (about 1 liter) of liquid water by 20°C, from 10°C to 30°C (50°F to 86°F) requires 83.6 kJ (kilojoules) of energy. However, to melt ice and raise the resulting water temperature by 20°C requires extra energy. To heat ice from 0°C to 20°C (32°F to 68°F) requires 333.55 kJ for 1kg of ice to melt, plus 83.6 kJ to bring the 1kg of water to go up 20°C. This is a total of 417.15 kJ of energy. [Thanks to the Wikipedia authors for this example.] So, since ice melts in a drink, it removes much more energy (heat) from the liquid than a comparable amount of a substance that does not melt (in this case, rock.)

These Whiskey Stones are made from soapstone, which does have an advantage for the application. It turns out that soapstone has a fairly high “thermal conductivity (k).” The thermal conductivity of soapstone is about 6 or 7, while that of ice is 2.18 (the higher the value the better the material is at conducting heat.) Soapstone’s thermal conductivity value of about 7 is nothing in comparison to a material like copper, which has a thermal conductivity of 398 and is renowned for its ability to transfer heat. Still, soapstone is significantly better than ice at transferring heat, so soapstone should take heat from the beverage more rapidly than ice does.

However, this ignores an important factor in your glass; as ice warms, it melts, so fresh ice is continually exposed to the beverage. The soapstone does not melt, so once the outside of the cube has warmed, heat must travel through more and more material to reach the remaining cold at the core. As a result, the stones rapidly cool the drink by a few degrees, but then the cooling effect slows. This mitigates the slight advantage soapstone has in thermal conductivity. Even if this weren't the case, the lack of state change from solid to liquid would make the stones less effective than plain old ice.

Soapstone also fails vs. ice in regard to thermal capacity (the energy required to raise or lower the temperature of a material.) Ice has a thermal capacity of about 2.11J/g, where the thermal capacity of soapstone is only about 0.8J/g (depending on the exact makeup of the stone.) Thus, it takes less energy to warm (or cool) a quantity of soapstone than a unit of ice, so soapstone has less capacity for cooling a beverage than ice does.

In a real world case, I put the stones in the freezer for 24 hours. I then placed three of them (weighing 77 grams) in a heavy crystal glass with a shot of whisky at 72 degrees. The drink quickly decreased in temperature to 60°F. There the temperature decrease stopped. To my taste 60°F is still too warm. By contrast, 77 grams of ice (rather a lot – ice is much lighter than soapstone) brought a fresh 72 degree shot of whisky down to 40°F in the same time period.

Granted, some times you don't want melting ice diluting your drink. In that case, there are dozens of solutions that have been in use since alcohol was invented: pour the drink over ice in a mixing container, then into your glass; put the bottle in the fridge or freezer; put your glass in the fridge or freezer; and on, and on.

So, why did I buy them? I was taken in by the con. I wasn't thinking. I thought it was a "cute" idea. Doh!


Fishbowl - Cartoon by Andrew Sigal, (c) 2013

Isn't it cruel keeping them in there like that?
I wouldn't worry about it son. I don't think
they have enough brain cells to even
understand their surroundings.


FoodPool proudly supported the Online Bake Sale for the Philippines (#bakesale4pinas) with a matching grant. People from around the world bid on delicious goodies provided by generous food bloggers. The proceeds go to help the victims of typhoon Yolanda. Thank you!


Image from Delish.com


Yesterday, Delish.com posted an article about a petition being put forth by Vegans, complaining that Starbucks needlessly puts condensed milk in their pumpkin spice latte mix. Because of the condensed milk in the mix, it is impossible to make a Vegan pumpkin spiced latte. Other lattes offered by Starbucks use mixes that dont contain dairy products and can therefore be made with milk substitutes to produce a Vegan version of the beverage. See http://www.delish.com/food/recalls-reviews/vegans-petitioning-starbucks-pumpkin-spice-lattes?src=soc_fcbks.

I reacted to this story in a way born of ignorance. I wanted to publicly present my "mea culpa." I blew this one on so many levels. Let me hereby apologize for any aspersions I may have cast on Vegans or their traditional fall consumption of pumpkin spice lattes.

I did more research on the matter and learned a number of things that I had not known. First and foremost, it turns out that the Pilgrims were Vegans! Wow. That explains a lot! Furthermore, the tradition of consuming “pumpkin spice lattes” was introduced to the Pilgrims during the famous First Thanksgiving. It was, in fact, Chief Starbuck himself, leader of the Massachusett Indians, who brewed the first pumpkin spice latte ever tasted by a European. It occurred on that fateful day of sharing and celebration in 1621.

Furthermore, it turns out that the word “laghtee” is a Wampanoag word (adopted by the Massachusett) meaning “any type of frothy liquid, especially a beverage.” It was over two hundred years later that Italian Americans brought the Anglicized word “latte” back to Italy (along with the use of tomatoes in pizza.) Later, during WWII, riding the wave of Italian wartime nationalism, the similarity between this corruption of “laghtee” and the Latin “lactis” resulted in the creation of the myth that the “latte” was an Italian creation. This myth has spread far and wide despite numerous failed attempts by descendants of the Massachusett and Wampanoag to reclaim their rightful beverage history.

Needless to say, the “spice” in the original pumpkin spice latte was not the combination of cinnamon, nutmeg, and cloves that we think of today. The pumpkin spice latte was originally brewed with a powder made from the bark of the Gesundheit pine (Pinus gesundheit), known as “ahchoobangbang” in Wampanoag. Because of this, the pumpkin spice latte was a seasonal brew, since the pine only developed its distinctive flavor in the fall as the tree began preparing for the cold northern winter. The Gesundheit pine, named after famed 18th C. German botanist, Dr. Freidrich Gesundheit, went extinct in the early 1930s, not long after the discovery of penicillin. As a result, we now make our pumpkin spice latte with a mixture of “spice island” spices.

Apparently, drinking pumpkin spice lattes in fall has been a dearly held tradition among American Vegans, linking them to their Pilgrim ancestors. Furthermore, by surreptitiously adulterating their pumpkin spice latte mix with condensed milk, the Starbucks Corporation is guilty not only of depriving Vegans of this important fall beverage, but also of co-opting and perverting yet another Native American tradition. Not only has the Starbucks Corporation stolen and sullied the name of one of the greatest chiefs in Massachusett history (for which they have never provided ample compensation.) Not only are they earning huge revenues from the very brew that Chief Starbuck gave as a gift of peace to the Pilgrims. But, as if that weren’t enough, they are needlessly corrupting this traditional drink in a way that makes it unfit for the very people to whom it is most meaningful, further commodifying and distorting early American foodways.

My apologies for suggesting that Vegans should not work to protect this significant beverage. My comments in reacting to the original story were the result of an inexcusable ignorance of the true facts in this matter. I hope that this will serve as ample compensation for my earlier unfeeling words.


Note: for more important information on American culinary history you can learn about the Pie of July celebration here.


UPDATE: August 2017

After years of service, the composter I built and described below rotted away. Taking my learning from using this composter to heart, I designed and built The Grand-daddy of All Composters. Check it out!


UPDATE: November 2013

The original composter plans from which I developed this design called for screen on 4 of the 6 sides as well as between the bins. I'm am not sure if the creator of the 3-bin composter system had a particular climate in mind for that unit. However, here in the San Francisco Bay Area, I have been having trouble keeping the compost moist enough. Not long after completing my composter I added a microjet bubbler from my irrigation system to each of the bins. Still it was drying out. Finally I took a cue from the composter at the Gardens at Lake Merritt and removed the screen from the two ends, replacing them with wood. It appears that for my climate, during the summer, screen on 4 sides allowed for too much evaporation.

=======================================

Earlier this year I attended a talk on composting presented by the Alameda County Master Gardeners. They described a number of different composting systems and the pros and cons of each one. The system that they liked the best is a three bin composter. They provided a link to the StopWaste.org website describing how to make this composter: http://www.stopwaste.org/home/?page=445#3bin.

This composter is intended to be used is as follows: new material is always added to bin number one. After that material has broken down for a couple of weeks, it is then transferred to bin number two. By only ever placing semi-composted material into bin number two, this second bin gets filled up with dense material, thereby achieving the requisite one cubic yard of compost necessary to produce a hot compost. The third bin is used to hold completed compost until it is needed.

There are pros and cons to this system. The main plus is that it achieves the one cubic yard of compost necessary to get the compost to heat up. The biggest negative is that the unit is so… big! As designed, it requires a three foot by three foot by nine foot area in your garden. That is quite a lot of space for most home gardeners to dedicate to composting. In looking at the design, I realized that for most people the third bin isn't really necessary. The third bin is just for storage. Instead of providing this extra bin for finished compost, one could simply use the compost as it becomes ready, or store it in a trash can, or even just pile it up on the ground somewhere. By changing the design from three bins to two, the space required is reduced from nine to six feet in width. This also reduces the cost of the materials by one third.

I have designed and built such a two bin composter for my own use based on the original plans. I have also made a couple of modifications and updates to the original based upon availability of materials and personal preference, and I have added some comments on the construction process. I hope you find this useful.

Notes:
  • I have only built one such unit. If you find any errors in the plans below, or have recommendations for improvements, please let me know.
  • I have redrawn the original drawings with additional annotations to help make the process clearer. However, graphics are not my forte. If you have the skills to improve these, please let me know.
  • The original instructions assume that you have access to very straight lumber. Unfortunately, these days it is almost impossible to find good lumber. Virtually all lumber available at a reasonable price will be bent and warped. As a result is impossible to achieve the tolerances assumed by the original plans. The straighter you can get things, the better the results will be, but truly straight corners are virtually impossible on this scale.
  • The original plans are very specific about the size of the front openings. This is because one needs to cut the 1x6 slats to slide down into the front panel. Because modern lumber makes such accuracy almost impossible, I recommend not cutting the 1x6 pieces until the composter frame is complete. At that time you will want to custom cut each 1x6 so that it will slide into slots at the front. You will want to number each panel so that you know how they fit in. You may also need to chisel out the slots as necessary to fit the slats.
  • The original plans call for the use of ¼ mesh hardware cloth. However, hardware cloth is very expensive. For my two bin version of the composter, the hardware cloth alone would have cost about $45. Therefore, I chose to use chicken wire, which is much, much less expensive. So far I don't think the use of chicken wire in place of hardware cloth has been a problem. Because the use of chicken wire results in a nasty set of wires sticking out which can easily snag clothing and rip skin, I chose to add 1x2 furring strips nailed on top of the edges of the chicken wire. This covers the ragged wire edge.
  • It is interesting to note that the composter system in use at the Oakland Botanic Gardens (where the Master Gardeners presented this talk) does not use any kind of mesh on the outside of the bin. Their composter is entirely wood on the outside, with mesh on the bottom. Cutting and installing the chicken wire is a considerable effort and pain in the butt. Considering this effort and the cost of hardware cloth or chicken wire, if I had it to do all over again I think I would construct mine entirely of wood. Nonetheless, these plans are for a chicken wire based system. If you choose to use all wood you will need to develop your own plans.
  • The original instructions assume a fairly high degree of familiarity with woodworking. I have attempted to make it somewhat easier for novices to construct this composter; however, some woodworking experience really is required. It is also fair to assume that if you have the set of tools listed below, you are probably an experienced woodworker.
  • The author assumes no liability for any damages or injuries resulting from the construction or use of this composter. There are no warranties expressed or implied. The information provided herein is for entertainment purposes only.
  • Creative Commons License This two bin composter by Andrew Sigal is licensed under a Creative Commons Attribution-ShareAlike 3.0 Unported License.  Please feel free to share and use this design. However, when you do, please give credit to the original 3-bin composter plans on StopWaste.org, and credit me for my 2-bin design contained herein.

Tools:

You will need a saw for cutting the pieces of lumber to lengths. I used a compound miter saw which makes this project much, much easier. There are a lot of cuts to be made. You will also need a drill with a 3/8 inch bit. You will need a hammer, socket wrench, and tape measure. You will need to have tin snips for cutting the wire mesh and roofing materials, and a screwdriver. Personally, I found an electric screwdriver to be invaluable. A socket bit for the electric screwdriver was also very convenient. The other optional item which makes this job vastly easier is an air compressor with pneumatic brad nailer and staple gun. Otherwise, you'll need a handheld staple gun and additional nails - but be prepared for sore and tired hands at the end of the project.


Materials:

Lumber:
  • 2x4 - 6 @ 31.5”, 6 @ 36”, 4 @ 6', 3 @ 29”   * see note
  • 2x6 - 3 @ 36”
  • 2x2 - 4 @ 34.5”, 1 @ 6', 3 @ 29”
  • 1x6 - 12 @ 31”
  • [Optional] 1x2 furring strips - 3 @ 36”

* Note that you can economize on lumber by not cutting extra pieces for the three 29" 2x4's. These pieces of wood are only used to provide a surface onto which to staple the chicken wire. They are not structural. Therefore, they do not need to be single solid pieces. If you purchase 8' 2x4's (the most common and economical size,) when you cut your four 6' sections, you will have four 24" scraps. You can make up the three 29" pieces by using three 24" leftovers, and cutting the remaining 24" scrap piece into 5" segments (with a final 9" scrap.) You will also have scraps left over from cutting the 36" sections (you will get two 36" pieces from each 2x4x8 with a 24" piece of scrap.)
[Side note: if you are not familiar with lumber sizing, modern lumber is sold by nominal size, not actual size. Thus, a piece of wood that is called a '2x4' is not actually 2” x 4”. It is actually 1.5” x 3.5”. The reason is that originally lumber was sold unfinished. A 2x4 was 2” x 4”, but after planning it smooth, it becomes approximately 1.5” x 3.5”. Now lumber is sold prefinished, so the sizing does not match the name. However, the lengths for pieces of lumber are correct, so a 2x4x8 is actually 8' long.]


Fasteners:

Note: the original project calls for a lot of nails. Personally I dislike nails for a lot of reasons, and almost always choose to use screws. In my version of the project I substituted decking screws for almost all the places where nails were called for in the original. I used brads from my pneumatic brad gun to attach the 2x2's and 1x2's.
  • Carriage bolts with washers and nuts - 8 @ 3.5 x3/8 bolts, 8 nuts, 16 washers
  • Screws and/or nails - I am sorry that I did not count the screws and nails that I used. For screws I used primarily decking screws ranging from 1.5" to 3.5". I also used a handful of penny nails. Your choice of nails and screws will depend on your preferences and tools. This is a fine project for using up screws and nails that you have laying around.
  • Appropriate staples your staple gun (manual or pneumatic)
  • [Optional] brads if you are using a brad nailer.

Additional materials:

  • Corrugated Roofing (historically this would have been fiberglass, now one normally finds this made from polycarbonate material) - 1 piece of 8' x 26" , cut into three 32"  x 26"  pieces.
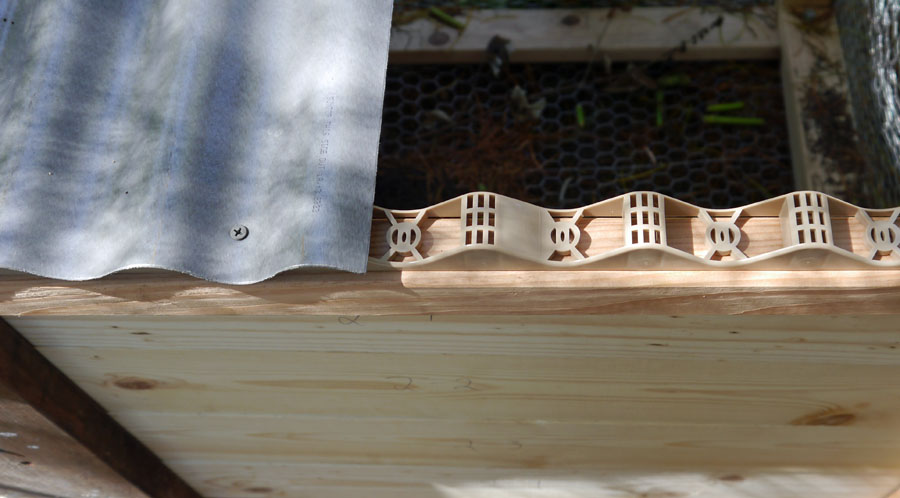
  • Wiggle molding - this is a product that has a wave shape that corresponds to the corrugations in corrugated roofing. It is used to mount the corrugated roofing to the top of the compost bin. You will need 12 feet. Theoretically you are supposed to use special gasketed roofing nails to attach corrugated roofing. However this is another expensive specialty item. Given that the project uses wiggle molding, and water-tightness is not a requirement, I found ordinary decking screws work just fine.
  • Hinges - Two hinges of a size sufficient to mount the roof. 3" hinges work well. Larger or smaller should also be fine. They should be made out of a material which will not rust such as galvanized steel or brass.
  • Flat corner braces - the original plan specifies 4 corner braces, however Home Depot no longer carries 4"  sizes in my area. I used 6"  and that was fine. You'll need 4 of them.
  • Flat T-braces - 2 braces. Again either 4" or 6" size.
  • [Optional] hook eyes, and 8' of chain or wire. This is used to hold the top so that it cannot flop over backwards. In my case the compost bin is up against a fence, so the top cannot open past 90 degrees and the hook eyes and chain were unnecessary.


Drawings:

As noted, I have redrawn the original drawings. I have also prepared three sets of drawings to help illustrate the construction. There are also photos of some details.

The composter showing only the lumber pieces.


Annotated with lumber dimensions.


Showing hardware components


Assembly:

Main structure:
  1. Screw together two 31.5” 2x4's (C) and two 36” 2x4's (B). Repeat three times to create the two end frames and one center divider. Attempt to make the frames as square as possible.
  2. Cut three 36” x 33.5” pieces of chicken wire and staple to the frames. The outer frames will have the chicken wire on the outside, the middle frame can have the chicken wire on either side.
  3. [Optional] Nail, brad, or screw 36” 1x2 furring strips over the top edges of the chicken wire.
  4. Drill 3/8” holes and bolt the frames to the 6' 2x4's (A). Two on the bottom and one on the top at the back as shown in the diagram. There is no 2x4 on the upper front.
  5. Screw the 29” 2x4's (D) onto the bottom of the frames, thereby filling in the gaps (or use three 24" pieces and three 5" pieces as noted above.) This will provide a surface for attaching chicken wire to the bottom of the structure.
  6. Cut two pieces of 6' x 36” chicken wire. Staple one to the back of the structure and one to the bottom.


Detail of optional furring strip covering sharp ends of chicken wire

Slats and slat tracks:
  1. Screw the 2x6's (E) to the front of the frame as shown.
  2. Leaving a one inch gap, nail, brad, or screw the 34.5” 2x2's (G) on the inside of the frame. This will create the track into which the 1x6 slats will slide.
  3. Once this is done, you can begin the process of cutting 1x6 slats to the correct lengths to slide into the frame. You may need to chisel out the frame or otherwise make modifications to allow the slats to correctly slide into place.


Details of 2x6's and 2x2's forming a channel to hold the front slats

Lid:
  1. Assemble the lid with flat corner and t-braces screwed to the bottom side. Note that the front, side and center brace pieces are all 2x2's (F & H), while the back piece of lumber is a 2x4 (A). This is done to make the lid lighter and easier to open and close, while still providing enough wood at the back to hold the hinges.
  2. Cut the corrugated roofing material into three 32” pieces. The easiest way to do this is with tin snips. Note that the roofing will be attached with the corrugations running front to back (see photo.)
  3. Place the wiggle molding along the front and back edges of the lid, and screw each piece down with one or two screws (this step only needs enough screws to hold the molding in place for the next step).
  4. Place the three pieces of corrugated roofing on top of the wiggle molding. Make sure that the corrugated roofing pieces overlap each other by at least one inch. Then drive screws through the roofing pieces and wiggle strips into the wooden lid frame.
  5. Place the lid on top of the main structure, attaching it with the hinges.
  6. If you are using a chain to restrain the lid from falling backwards, attach eye hooks to one edge of the lid and main bin and connect a chain, rope, or wire between them.


Detail of wiggle strips and roofing material


Finished composter:

When completed, this composter is quite heavy, so you will want to build it entirely in place, or pre-build part of it and complete it in place, or have several people available to assist with moving the completed unit. Even with a compound miter saw with laser, electric screw drivers and drills, and pneumatic tools, this project took many hours to complete, and cost well over $100. However, the result is a pretty great, high end, compost system.

The finished composter, open, with one slat removed.

I look forward to hearing your comments.


If you enjoyed this post, check out my Herb and Seed Cleaner.


This is my 100th posting on The Uncarved Block. Woo hoo!

I wrote my first post on June 27, 2008. At about that time I saw an article that said that the average blog was read by six people and was maintained for three months. I don’t know if that is still true (and I don’t really know if it was true at the time.) Regardless, it feels good to have gone well beyond those anemic numbers.

On the other hand, four and a half years to post 100 entries is hardly a raging torrent of prose. For a blog like The Daily Kos, 100 postings is barely a flicker. But I feel like this is a moment worthy of my notice and appropriate for reflection. I’m not sure why, but over the years I have gone through periods where I felt like I had a lot to say – a lot to write – and that I wanted to put it out in public. But then there were other times when I would go for days, weeks, or even months without writing a word. Friends tell me that this inconsistency is deadly for a blog; people only want to subscribe to something that they can read every day like the newspaper, or at the worst, once a week like a TV show.

One of the hardest things about continuing to write is the lack of feedback. I’m able to get reports of the number of visitors to the blog and its various posts. I find these statistics confusing at best. Let’s say this week there were 500 page views, 250 visitors, and 200 unique visitors. Hmmmmmm. What do those numbers really tell me? Of all those views and visitors, none left a trace – not a comment, not a “like” on Facebook, not a Google+, not a tweet. Did these visitors enjoy what they read? Was it valuable to them? Did they even read it, or did they find the post through a search engine only to discover that it wasn't what they wanted, then leave within seconds to search for something else?

I wish people would give me some kind of feedback, some crumb or clue, even if it is negative. I think I would be happier getting comments like “why are you wasting your time on this crap” than facing the current state of silence. I find it disconcerting that a post like Repairing an Antique Soda Siphon can get 4000 hits but only three comments. The other 3997 readers had nothing to say? Ah, well. I am fairly sure that most people that get to a posting on this blog arrived there through a search engine. They search for something like “Sparklets soda siphon,” which takes them to that post. Even if it is the material that they wanted, they don’t stick around. They wanted to find out about Sparlets soda siphons, got the information they were looking for, and left. They aren't inspired to see what I have to say about seed cleaning, or Rodney King, or dogs having Buddha nature.

I had some excellent feedback from a good friend about the blog as a whole. He said that I cover too diverse a set of ideas and suggested that I make it much more focused. He said it should be about food, gardening, and my dog - and nothing else. He is quite right. Such a blog could generate a following, a readership, possibly even a dialogue. But it’s not really what I want to write. I want to write about whatever interests me at the time. So I have to choose. Do I write what I want to write and not get the response I desire, or do I try to get the response that I want without the opportunity to ramble. Sigh.

My second post, way back in June of '08, was entitled “Graffiti”. In it I pondered the question of why I was writing this blog at all. Ninety eight posts later I still don’t have an answer. I’ll check in again at post 200 to tell you what I've found.